Macのスクリーンキャプチャの保存場所を変える

前からやりたかったことなんですが、
Macのスクリーンキャプチャをしてて常に、デスクトップ上に保存されてて困ってたので、
変えてみました。

以下の方法で変更できるみたいですが、もしやられる方は自己責任で。
1)ターミナルを起動
2)コマンドを実行、今回はデスクトップ上の「capture」フォルダに。

> defaults write com.apple.screencapture location ~/Desktop/capture
> killall SystemUIServer

ということで、これで完了です。

元に戻したくなった場合は

> defaults write com.apple.screencapture location 
> killall SystemUIServer

これでOKです。


[iTunes]音楽アルバムにアートワークが設定できない

ちょっとハマった事象です。

かなり前にCDからiTunesにインポートした音楽アルバムがあり、

それにアートワークをセットしてたのですが、全くセットされなかったので、

画像が悪いのかなと思い、いろいろ試したのですが、それでも全く変わらず・・・。

google先生に聞いてみたら、見事ヒット

原因は、WAVファイルだったことみたいです。

で、「Appleロスレス形式」ってのにすれば、いいらしいということで。

MACでのやり方です。(Windowsにもよく似た設定はあるかと。)

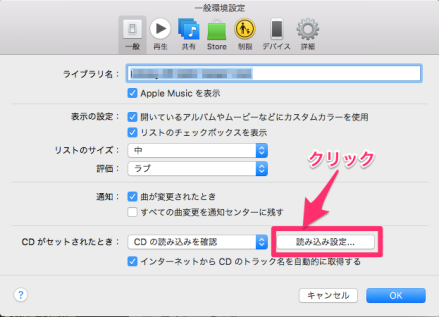
「iTunes」メニューから「環境設定」をクリック。

そのあとは、次の順番で実行します。

001

002

003

そしたら、同じ題名の曲が二つできますが、片方はWAVファイルなので、そちらを消してあげればOK。

で、アートワークを設定すると見事成功。

よかった。

awscliをアップグレード(El Capitan)

今から、AWS CLIを使って、なんかしようと思ったので、

バージョンアップしようかなと思ったのが、ことの発端。


なんかエラーが出ました。

macbookair:~ userareaz$ aws –version
aws-cli/1.7.40 Python/2.7.10 Darwin/15.3.0
macbookair:~ userareaz$ sudo pip install -U awscli
The directory ‘/Users/userareaz/Library/Caches/pip/http’ or its parent directory is not owned by the current user and the cache has been disabled. Please check the permissions and owner of that directory. If executing pip with sudo, you may want sudo’s -H flag.
You are using pip version 7.1.0, however version 8.0.2 is available.
You should consider upgrading via the ‘pip install –upgrade pip’ command.
The directory ‘/Users/userareaz/Library/Caches/pip/http’ or its parent directory is not owned by the current user and the cache has been disabled. Please check the permissions and owner of that directory. If executing pip with sudo, you may want sudo’s -H flag.
Collecting awscli
Downloading awscli-1.10.1-py2.py3-none-any.whl (880kB)
100% |████████████████████████████████| 884kB 494kB/s
Collecting botocore==1.3.23 (from awscli)
Downloading botocore-1.3.23-py2.py3-none-any.whl (2.2MB)
100% |████████████████████████████████| 2.2MB 120kB/s
Collecting rsa<=3.3.0,>=3.1.2 (from awscli)
Downloading rsa-3.3-py2.py3-none-any.whl (44kB)
100% |████████████████████████████████| 45kB 5.8MB/s
Requirement already up-to-date: colorama<=0.3.3,>=0.2.5 in /Library/Python/2.7/site-packages (from awscli)
Requirement already up-to-date: docutils>=0.10 in /Library/Python/2.7/site-packages (from awscli)
Collecting jmespath<1.0.0,>=0.7.1 (from botocore==1.3.23->awscli)
Downloading jmespath-0.9.0-py2.py3-none-any.whl
Collecting python-dateutil<3.0.0,>=2.1 (from botocore==1.3.23->awscli)
Downloading python_dateutil-2.4.2-py2.py3-none-any.whl (188kB)
100% |████████████████████████████████| 192kB 2.2MB/s
Collecting pyasn1>=0.1.3 (from rsa<=3.3.0,>=3.1.2->awscli)
Downloading pyasn1-0.1.9-py2.py3-none-any.whl
Collecting six>=1.5 (from python-dateutil<3.0.0,>=2.1->botocore==1.3.23->awscli)
Downloading six-1.10.0-py2.py3-none-any.whl
Installing collected packages: jmespath, six, python-dateutil, botocore, pyasn1, rsa, awscli
Found existing installation: jmespath 0.7.1
Uninstalling jmespath-0.7.1:
Successfully uninstalled jmespath-0.7.1
Found existing installation: six 1.4.1
DEPRECATION: Uninstalling a distutils installed project (six) has been deprecated and will be removed in a future version. This is due to the fact that uninstalling a distutils project will only partially uninstall the project.
Uninstalling six-1.4.1:
Exception:
Traceback (most recent call last):
File “/Library/Python/2.7/site-packages/pip-7.1.0-py2.7.egg/pip/basecommand.py”, line 223, in main
status = self.run(options, args)
File “/Library/Python/2.7/site-packages/pip-7.1.0-py2.7.egg/pip/commands/install.py”, line 299, in run
root=options.root_path,
File “/Library/Python/2.7/site-packages/pip-7.1.0-py2.7.egg/pip/req/req_set.py”, line 640, in install
requirement.uninstall(auto_confirm=True)
File “/Library/Python/2.7/site-packages/pip-7.1.0-py2.7.egg/pip/req/req_install.py”, line 726, in uninstall
paths_to_remove.remove(auto_confirm)
File “/Library/Python/2.7/site-packages/pip-7.1.0-py2.7.egg/pip/req/req_uninstall.py”, line 125, in remove
renames(path, new_path)
File “/Library/Python/2.7/site-packages/pip-7.1.0-py2.7.egg/pip/utils/__init__.py”, line 314, in renames
shutil.move(old, new)
File “/System/Library/Frameworks/Python.framework/Versions/2.7/lib/python2.7/shutil.py”, line 302, in move
copy2(src, real_dst)
File “/System/Library/Frameworks/Python.framework/Versions/2.7/lib/python2.7/shutil.py”, line 131, in copy2
copystat(src, dst)
File “/System/Library/Frameworks/Python.framework/Versions/2.7/lib/python2.7/shutil.py”, line 103, in copystat
os.chflags(dst, st.st_flags)
OSError: [Errno 1] Operation not permitted: ‘/tmp/pip-Deg5y5-uninstall/System/Library/Frameworks/Python.framework/Versions/2.7/Extras/lib/python/six-1.4.1-py2.7.egg-info’

例のヤツ(six)です。

この際だから、pipもアップグレード

macbookair:~ userareaz$ sudo pip install –upgrade pip
The directory ‘/Users/userareaz/Library/Caches/pip/http’ or its parent directory is not owned by the current user and the cache has been disabled. Please check the permissions and owner of that directory. If executing pip with sudo, you may want sudo’s -H flag.
You are using pip version 7.1.0, however version 8.0.2 is available.
You should consider upgrading via the ‘pip install –upgrade pip’ command.
The directory ‘/Users/userareaz/Library/Caches/pip/http’ or its parent directory is not owned by the current user and the cache has been disabled. Please check the permissions and owner of that directory. If executing pip with sudo, you may want sudo’s -H flag.
Collecting pip
Downloading pip-8.0.2-py2.py3-none-any.whl (1.2MB)
100% |████████████████████████████████| 1.2MB 352kB/s
Installing collected packages: pip
Found existing installation: pip 7.1.0
Uninstalling pip-7.1.0:
Successfully uninstalled pip-7.1.0
Successfully installed pip-8.0.2

で、この間やった「–ignore-installed six」をやることに。

macbookair:~ userareaz$ sudo pip install awscli –upgrade –ignore-installed six
The directory ‘/Users/userareaz/Library/Caches/pip/http’ or its parent directory is not owned by the current user and the cache has been disabled. Please check the permissions and owner of that directory. If executing pip with sudo, you may want sudo’s -H flag.
The directory ‘/Users/userareaz/Library/Caches/pip’ or its parent directory is not owned by the current user and caching wheels has been disabled. check the permissions and owner of that directory. If executing pip with sudo, you may want sudo’s -H flag.
Collecting awscli
Downloading awscli-1.10.1-py2.py3-none-any.whl (880kB)
100% |████████████████████████████████| 884kB 572kB/s
Collecting six
Downloading six-1.10.0-py2.py3-none-any.whl
Collecting botocore==1.3.23 (from awscli)
Downloading botocore-1.3.23-py2.py3-none-any.whl (2.2MB)
100% |████████████████████████████████| 2.2MB 200kB/s
Collecting rsa<=3.3.0,>=3.1.2 (from awscli)
Downloading rsa-3.3-py2.py3-none-any.whl (44kB)
100% |████████████████████████████████| 45kB 4.8MB/s
Collecting colorama<=0.3.3,>=0.2.5 (from awscli)
Downloading colorama-0.3.3.tar.gz
Collecting docutils>=0.10 (from awscli)
Downloading docutils-0.12.tar.gz (1.6MB)
100% |████████████████████████████████| 1.6MB 266kB/s
Collecting jmespath<1.0.0,>=0.7.1 (from botocore==1.3.23->awscli)
Downloading jmespath-0.9.0-py2.py3-none-any.whl
Collecting python-dateutil<3.0.0,>=2.1 (from botocore==1.3.23->awscli)
Downloading python_dateutil-2.4.2-py2.py3-none-any.whl (188kB)
100% |████████████████████████████████| 192kB 1.8MB/s
Collecting pyasn1>=0.1.3 (from rsa<=3.3.0,>=3.1.2->awscli)
Downloading pyasn1-0.1.9-py2.py3-none-any.whl
Installing collected packages: jmespath, six, python-dateutil, docutils, botocore, pyasn1, rsa, colorama, awscli
Running setup.py install for docutils … done
Running setup.py install for colorama … done
Successfully installed awscli-1.10.1 botocore-1.1.3 colorama-0.3.3 docutils-0.12 jmespath-0.9.0 pyasn1-0.1.8 python-dateutil-1.5 rsa-3.1.4 six-1.4.1

よかった。

でも、El Capitan+six…。

いい相性ですT_T。

インストールしてみた〜AWS SDK for Python (Boto3)〜

年も明けたので、Pythonに手を出してみようかと思い、

コマンドを実行してみました。


$ sudo pip install boto3


すると


The directory ‘/Users/userareaz.wordpress.com/Library/Caches/pip/http’ or its parent directory is not owned by the current user and the cache has been disabled. Please check the permissions and owner of that directory. If executing pip with sudo, you may want sudo’s -H flag.

You are using pip version 7.1.0, however version 7.1.2 is available.

You should consider upgrading via the ‘pip install –upgrade pip’ command.

The directory ‘/Users/userareaz.wordpress.com/Library/Caches/pip/http’ or its parent directory is not owned by the current user and the cache has been disabled. Please check the permissions and owner of that directory. If executing pip with sudo, you may want sudo’s -H flag.

Collecting boto3

  Downloading boto3-1.2.3-py2.py3-none-any.whl (108kB)

    100% |████████████████████████████████| 110kB 1.7MB/s

Requirement already satisfied (use –upgrade to upgrade): jmespath<1.0.0,>=0.7.1 in /Library/Python/2.7/site-packages (from boto3)

Collecting futures<4.0.0,>=2.2.0 (from boto3)

  Downloading futures-3.0.3-py2-none-any.whl

Collecting botocore<1.4.0,>=1.3.0 (from boto3)

  Downloading botocore-1.3.15-py2.py3-none-any.whl (2.1MB)

    100% |████████████████████████████████| 2.1MB 227kB/s

Collecting python-dateutil<3.0.0,>=2.1 (from botocore<1.4.0,>=1.3.0->boto3)

  Downloading python_dateutil-2.4.2-py2.py3-none-any.whl (188kB)

    100% |████████████████████████████████| 192kB 2.1MB/s

Requirement already satisfied (use –upgrade to upgrade): docutils>=0.10 in /Library/Python/2.7/site-packages (from botocore<1.4.0,>=1.3.0->boto3)

Collecting six>=1.5 (from python-dateutil<3.0.0,>=2.1->botocore<1.4.0,>=1.3.0->boto3)

  Downloading six-1.10.0-py2.py3-none-any.whl

Installing collected packages: futures, six, python-dateutil, botocore, boto3

  Found existing installation: six 1.4.1

    DEPRECATION: Uninstalling a distutils installed project (six) has been deprecated and will be removed in a future version. This is due to the fact that uninstalling a distutils project will only partially uninstall the project.

    Uninstalling six-1.4.1:

Exception:

Traceback (most recent call last):

  File “/Library/Python/2.7/site-packages/pip-7.1.0-py2.7.egg/pip/basecommand.py”, line 223, in main

    status = self.run(options, args)

  File “/Library/Python/2.7/site-packages/pip-7.1.0-py2.7.egg/pip/commands/install.py”, line 299, in run

    root=options.root_path,

  File “/Library/Python/2.7/site-packages/pip-7.1.0-py2.7.egg/pip/req/req_set.py”, line 640, in install

    requirement.uninstall(auto_confirm=True)

  File “/Library/Python/2.7/site-packages/pip-7.1.0-py2.7.egg/pip/req/req_install.py”, line 726, in uninstall

    paths_to_remove.remove(auto_confirm)

  File “/Library/Python/2.7/site-packages/pip-7.1.0-py2.7.egg/pip/req/req_uninstall.py”, line 125, in remove

    renames(path, new_path)

  File “/Library/Python/2.7/site-packages/pip-7.1.0-py2.7.egg/pip/utils/__init__.py”, line 314, in renames

    shutil.move(old, new)

  File “/System/Library/Frameworks/Python.framework/Versions/2.7/lib/python2.7/shutil.py”, line 302, in move

    copy2(src, real_dst)

  File “/System/Library/Frameworks/Python.framework/Versions/2.7/lib/python2.7/shutil.py”, line 131, in copy2

    copystat(src, dst)

  File “/System/Library/Frameworks/Python.framework/Versions/2.7/lib/python2.7/shutil.py”, line 103, in copystat

    os.chflags(dst, st.st_flags)

OSError: [Errno 1] Operation not permitted: ‘/tmp/pip-nHWFG7-uninstall/System/Library/Frameworks/Python.framework/Versions/2.7/Extras/lib/python/six-1.4.1-py2.7.egg-info’

年始早々、エラーに悩まされるとは・・・。

でも、エラーの内容を見てると「six」ってのが悪そうです。

理由はわかりまへん。

とりあえず、Google先生に確認してみると

ココを見ろ」と言われたので、チェックしてみると同じことになってる人が。

ということで、書かれてる通りのことをやってました。

$ sudo pip install –ignore-install six boto3

The directory ‘/Users/userareaz.wordpress.com/Library/Caches/pip/http’ or its parent directory is not owned by the current user and the cache has been disabled. Please check the permissions and owner of that directory. If executing pip with sudo, you may want sudo’s -H flag.

You are using pip version 7.1.0, however version 7.1.2 is available.

You should consider upgrading via the ‘pip install –upgrade pip’ command.

The directory ‘/Users/userareaz.wordpress.com/Library/Caches/pip/http’ or its parent directory is not owned by the current user and the cache has been disabled. Please check the permissions and owner of that directory. If executing pip with sudo, you may want sudo’s -H flag.

Collecting six

  Downloading six-1.10.0-py2.py3-none-any.whl

Collecting boto3

  Downloading boto3-1.2.3-py2.py3-none-any.whl (108kB)

    100% |████████████████████████████████| 110kB 3.0MB/s

Collecting jmespath<1.0.0,>=0.7.1 (from boto3)

  Downloading jmespath-0.9.0-py2.py3-none-any.whl

Collecting futures<4.0.0,>=2.2.0 (from boto3)

  Downloading futures-3.0.3-py2-none-any.whl

Collecting botocore<1.4.0,>=1.3.0 (from boto3)

  Downloading botocore-1.3.15-py2.py3-none-any.whl (2.1MB)

    100% |████████████████████████████████| 2.1MB 190kB/s

Collecting python-dateutil<3.0.0,>=2.1 (from botocore<1.4.0,>=1.3.0->boto3)

  Downloading python_dateutil-2.4.2-py2.py3-none-any.whl (188kB)

    100% |████████████████████████████████| 192kB 1.6MB/s

Collecting docutils>=0.10 (from botocore<1.4.0,>=1.3.0->boto3)

  Downloading docutils-0.12.tar.gz (1.6MB)

    100% |████████████████████████████████| 1.6MB 248kB/s

Installing collected packages: six, jmespath, futures, python-dateutil, docutils, botocore, boto3

  Running setup.py install for docutils

Successfully installed boto3-1.2.3 botocore-1.1.3 docutils-0.12 futures-3.0.3 jmespath-0.7.1 python-dateutil-1.5 six-1.4.1


いけました!


原因は、El Capitanにしたことにあるようです。

よくわかってないですが・・・。


ということで、これができたので、Python でSDKを叩いてみようかと。
 

RaspberryPi2 – MBAとシリアル接続

同じ時期にAmazonで買ったものや
その後にAmazonで買ったものより、
さらに後に来たUSBでシリアル接続できる
アレがやっと届きました。

「10月19日に発送で10月21日から11月2日までの間にお届け」
って書いてたので、まぁ、そのうち届くことか程度で考えてたら、
リミットの11月2日になっても届かないという残念なことに。

11月3日はJAWS FESTAへ行くことにしてたので、
届いても何もできずということに・・・。

結果、11月4日に届いたとさ。
残念。。。

は、置いといて。
MBAにつないでみました。

差し込んでみた

参考サイトをみながら。

URLが変わってた?か何かで結果的に、ココに。

で、ZIPをDLして、PKGをインストール。
#macの場合、「control」キーを押しながら、ダブルクリックして、開くってしないとダメです。

で、インストールが完了したら、macの再起動が必要です。

再起動が終わったら、

参考サイト通りに緑/白/黒を指して、USBをmacにさしてみます。

Terminalを起動して、「screen /dev/tty.usbserial 11520」を実行。
後は、ログインするだけなんですが、ログインプロンプトが出てきません。
2〜3分待って、ユーザ名として「pi」って入力して、
入力できたら、Enterキーを押して、
パスワード「raspberry」を入れて、Enterキーを押してください。

あら、不思議。ログインできました。

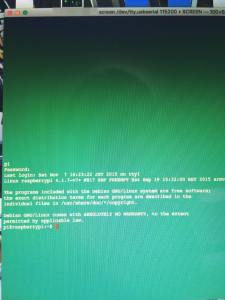
ログインできた

これまでいろいろ時間がかかってたのに、これだけはあっさり。

で、終了するときには、「Ctrl+A Ctrl+¥」で終了。

ここからは課題なんですが、一度これをして、もう一度つないだら、文字入力しても、
一切反応せず・・・。
もうちょっと調べて、情報出そうかと思います。

[MBA] タイムマシーンに乗って〜

前々からタイムマシーンに乗りたかったです。

でも、ドラえもんが。。。

というのは、置いといて、やっと今、TimeMachineの設定をやりました。

普段から難しく考えるタチなので、時間がかかってしまいましたが、

やれば、簡単。

で、2回目また同じパターンに陥ること確実なので、残しておくことにしました。

ということで、HDL-CE2.0Bを使って、TimeMachineを設定したログです。

準備したもの
○ mba
○ I・O DATA HDL-CE2.0B
○ 無線LAN

じゃ、始めます。

[手順1] おまじないコマンドを実行する
ターミナル(「LaunchPad」→「その他」→「ターミナル」)を起動し、
次のおまじないコマンドを実行する。

$ sudo defaults write com.apple.systempreferences TMShowUnsupportedNetworkVolumes 1

※コレ、実は一行なので注意
※「$」はコマンドのプロンプトなので、無視

[手順2] NAS側で共有フォルダ作成
基本的に割愛。
やる事は、
○ユーザの作成
○共有フォルダの作成(先ほど作成したユーザのみフォルダアクセス許可にする)
ここでは、共有フォルダ名を「MacTimeMachine」とする。

[手順3] NASをマウント
Finderのメニュー「移動」→「サーバへ接続」をクリック

私の場合、smbで接続しているので、

smb://192.168.1.1/

で追加してます。

[手順4] 情報収集
この後、イメージを作成するのに必要な情報を集めます。
○ホスト名
 「システム環境設定」→「共有」をクリック。
 すると「コンピュータ名」って出るので、それをコピー。
 ただ、私は小心者なので、感じとかスペースがあると
 この後、何か問題がでるのではないか?と勝手に思い、
 英字とハイフンだけにしてしまいました。数字もOKかなと。
 ここでは例として、「mba-userareaz」としておきます。
 
○MACアドレス
 「システム環境設定」→「ネットワーク」をクリック。
 私は、WiFiで接続しているので、左側の一覧で「Wi-Fi」を選択して、
 右下の「詳細…」ボタンをクリック。
 表示された下の方に「Wi-Fiアドレス」と書かれた右側の情報をコピーしてください。

 なんかこんな感じの文字です。 「12:34:56:78:90:AB」
 数字もしくは英字2桁をコロンで区切ってるやつです。
 で、コロンを削除したものを覚えておいてください。
 この場合だと「1234567890AB」です。

[手順5] イメージの作成
ディスクユーティリティ(「LaunchPad」→「その他」→「ディスクユーティリティ」)を起動し、
右上の「新規イメージ」ボタンをクリック。
上にある名前は先ほど情報収集したものをベースに作成する
“ホスト名”_”MACアドレス”にします。

で、上の例だと「mba-userareaz_1234567890AB」と入れます。

場所は、とりあえず「デスクトップ」に設定。

で次の名前は適当(今回は「MacTimeMachine」とした)に入れ、
場所は、共有ディスクで作成した「MacTimeMachine」を設定。
サイズは後で変更するので、とりあえず「100MB」に設定。
後は、以下のような感じで設定しました。
・フォーマット:Mac OS 拡張(ジャーナリング)
・暗号化:なし
・パーティション:単一パーティション – Apple パーティションマップ
・イメージフォーマット:スパースバンドル・ディスクイメージ
で、作成ボタンをポチリ。

[手順6] イメージの移動と変更
イメージの作成できたら、右側に表示される「mba-userareaz_1234567890AB.sparsebundle」をクリックし、
画面上部の取り出しボタンをクリックして、メニューを表示して削除してください。

で、デスクトップ上に「mba-userareaz_1234567890AB.sparsebundle」ファイルが出来上がってるので、

このファイルをNAS上にコピーして、ダブルクリックしてください。

そしたら、ディスクユーティリティにまた表示されるようになります。

で、また取り出しをクリック。

ココから、イメージのサイズを変更します。

画面左側の「mba-userareaz_1234567890AB.sparsebundle」を選択すると

「イメージのサイズ変更」ってボタンが押せるようになるので、クリックする。

で、僕の場合は、容量十分あるのですが、150GBに設定。

【ココ重要】見た目上は、100MBから変わってない感じがしますが、大丈夫!!
      ちゃんと変わってますよ。

ということで、NAS上にコピーした「mba-userareaz_1234567890AB.sparsebundle」ファイルを

またもやダブルクリックして下さい。

するとあら。ちゃんと150GBになってるじゃありませんか。

ということで、次は、画面右側の「パーティション」ってとこをクリックすると

プルダウンで「現在の設定」ってのが表示されているところを「1パーティション」に変更。

後は、名前入れて、フォーマット:Mac OS 拡張(ジャーナリング)、サイズを表示されてるままで適用をクリック。

数分待つと完了するはずです。

[手順7] 最後にまたおまじない

ターミナル(「LaunchPad」→「その他」→「ターミナル」)を起動し、
次のおまじないコマンドを実行する。

$ sudo tmutil setdestination “/Volumes/TimeMachine 1”

※コレ、実は一行なので注意
※「$」はコマンドのプロンプトなので、無視
※私の場合、マウントポイントに書かれてた文字が「/Volumes/TimeMachine 1」だったので、それを記載。

後は、TimeMachineをオンにすれば、できあがりです。

ちなみに、私の初回バックアップは12時間くらい掛かった気がします。

気長にやってきましょ。